MySQL Workbench is a unified visual database designing or graphical user interface tool used for working with database architects, developers, and Database Administrators. It is developed and maintained by Oracle. It provides SQL development, data modeling, data migration, and comprehensive administration tools for server configuration, user administration, backup, and many more. We can use this Server Administration for creating new physical data models, E-R diagrams, and for SQL development (run queries, etc.). It is available for all major operating systems like Mac OS, Windows, and Linux. MySQL Workbench fully supports MySQL Server version v5.6 and higher.
MySQL Workbench covers five main functionalities , which are given below:
SQL Development: This functionality provides the capability that enables you to execute SQL queries, create and manage connections to the database Servers with the help of built-in SQL editor.
Data Modelling (Design): This functionality provides the capability that enables you to create models of the database Schema graphically, performs reverse and forward engineering between a Schema and a live database, and edit all aspects of the database using the comprehensive Table editor. The Table editor gives the facilities for editing tables, columns, indexes, views, triggers, partitioning, etc.
Server Administration: This functionality enables you to administer MySQL Server instances by administering users, inspecting audit data, viewing database health, performing backup and recovery, and monitoring the performance of MySQL Server.
Data Migration: This functionality allows you to migrate from Microsoft SQL Server, SQLite, Microsoft Access, PostgreSQL, Sybase ASE, SQL Anywhere, and other RDBMS tables, objects, and data to MySQL. It also supports migrating from the previous versions of MySQL to the latest releases.
MySQL Enterprise Supports: This functionality gives the support for Enterprise products such as MySQL firewall, MySQL Enterprise Backup, and MySQL Audit.
MySQL Workbench Editions
MySQL Workbench is mainly available in three editions, which are given below:
- Community Edition (Open Source, GPL)
- Standard Edition (Commercial)
- Enterprise Edition (Commercial)
Community Edition
The Community Edition is an open-source and freely downloadable version of the most popular database system. It came under the GPL license and is supported by a huge community of developers.
Standard Edition
It is the commercial edition that provides the capability to deliver high-performance and scalable Online Transaction Processing (OLTP) applications. It has made MySQL famous along with industrial-strength, performance, and reliability.
Enterprise Edition
It is the commercial edition that includes a set of advanced features, management tools, and technical support to achieve the highest scalability, security, reliability, and uptime. This edition also reduces the risk, cost, complexity in the development, deployment, and managing MySQL applications.
Let us understand it with the following comparison chart.
| Functionality | Community Edition | Standard Edition | Enterprise Edition |
|---|---|---|---|
| Visual SQL Development | Yes | Yes | Yes |
| Visual Database Administration | Yes | Yes | Yes |
| Performance Tuning | Yes | Yes | Yes |
| User and Session Management | Yes | Yes | Yes |
| Connection Management | Yes | Yes | Yes |
| Object Management | Yes | Yes | Yes |
| Data Management | Yes | Yes | Yes |
| Visual Data Modelling | Yes | Yes | Yes |
| Reverse Engineering | Yes | Yes | Yes |
| Forward Engineering | Yes | Yes | Yes |
| Schema Synchronization | Yes | Yes | Yes |
| Schema & Model Validation | No | Yes | Yes |
| DBDoc | No | Yes | Yes |
| GUI for MySQL Enterprise Backup | No | No | Yes |
| GUI for MySQL Enterprise Audit | No | No | Yes |
| GUI for MySQL Enterprise Firewall | No | Yes | Yes |
| Scripting & Plugins | Yes | Yes | Yes |
| Database Migration | Yes | Yes | Yes |
MySQL Workbench Environment Setup
Here, we are going to learn how we can download and install MySQL Workbench.
Prerequisites
The following requirements should be available in your system to work with MySQL Workbench:
- MySQL Server: You can download it from here.
- MySQL Workbench: You can download it from here.
- Microsoft .NET Framework 4.5.2
- Microsoft Visual C++ Redistributable for Visual Studio 2019
- RAM 4 GB (6 GB recommended)
Installation
Step 1: Install the MySQL Community Server. To install MySQL Server, double click the MySQL installer .exe file . After clicking the .exe file, you can see the following screen:

Step 2: Choose the Setup Type and click on the Next button. There are several types available, and you need to choose the appropriate option to install MySQL product and features. Here, we are going to select a Custom option because there is a need for only MySQL Server and Workbench. If you need more features, you can choose the Full option.

Step 3: When you click on the Next button, it will give the following screen.

In this screen, go to the MySQL Server section, click the plus (+) icon. Here, you need to choose the MySQL Server and add it to the right side box by clicking on the right arrow symbol.

Now, in the Application section , you need to do the same thing that you had to perform with MySQL Server and click on the Next button. The following screen explains it more clearly.

Step 4: When you click on Next, it will give the following screen. This screen checks all the requirements for installing MySQL Server and Workbench. As soon as you click on the Execute button, it will install all requirements automatically. Now, click on the Next button.

Step 5: In this screen, click on the Execute button to download and install the MySQL Server and Workbench.

When the downloading and installation is complete, click on Next button.

Step 6: In the next screen, we need to configure the MySQL Server and click on Next button.

Step 7: As soon as you will click on the Next button, you can see the screen below. Here, we have to configure the MySQL Server. Now, choose the Standalone MySQL Server/Classic MySQL Replication option and click on Next.

Step 8: In the next screen, the system will ask you to choose the Config Type and other connectivity options. Here, we are going to select the Config Type as ’ Development Machine ’ and Connectivity as TCP/IP, and Port Number is 3306, then click on Next.

Step 9: Now, select the Authentication Method and click on Next.

Step 10: The next screen will ask you to choose the account, username, and password. After filling all the details, click on the Next button.

Step 11: The next screen will ask you to configure the Windows Service. Keep the default setup and click on Next.

Step 12: In the next screen, the system will ask you to apply the Server Configuration. For this configuration, click on the Execute button.

Step 13: Once the configuration has completed, you will get the screen below. Now, click on the Finish button to continue.

Step 14: In the next screen, you can see that the Product Configuration is completed. Keep the default setting and click on the Next-> Finish button to complete the MySQL package installation.


Step 15: Once you click the Finish button, the MySQL Workbench should be open on your system, as shown in the screen below.

Step 16: In the above screen, you need to make a connection. To do this, double click the box designated by the red arrow . Here, you will get the popup screen that asks to enter the password created earlier during the installation. After entering the password, you are able to connect with the Server.

Step 17: If you do not have a connection, you can create a new connection. To make a connection, click the plus (+) icon or go to the menu bar -> Database -> Connect to Database, the following screen appears. Now, you need to fill all the details. Here, you have to make sure that the entered password should be the same as you have created earlier.
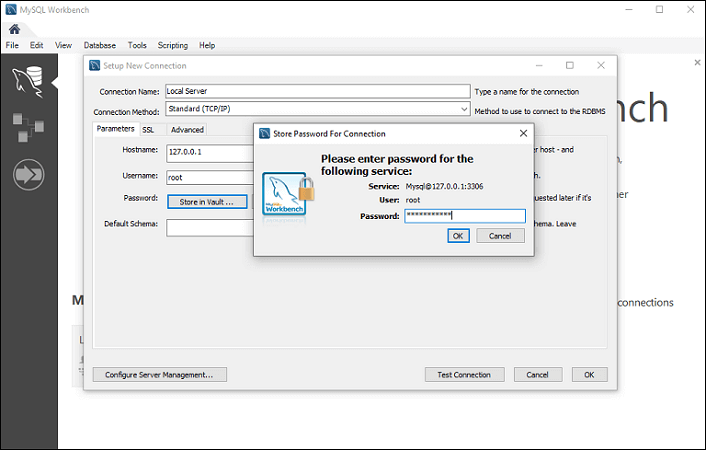
Step 18: After entering all the details, click on the Test Connection to test the database connectivity. If the connection is successful, you will get the following screen. Now, click on OK->OK button to finish the setup.

Step 19: Once you have finished all the setup, it will open the MySQL Workbench screen. Now, double click on the newly created connection, you will get the following screen where the SQL command can be executed.
