Create an extract
Though there are several options in your Tableau workflow for creating an extract, the primary method is described below.
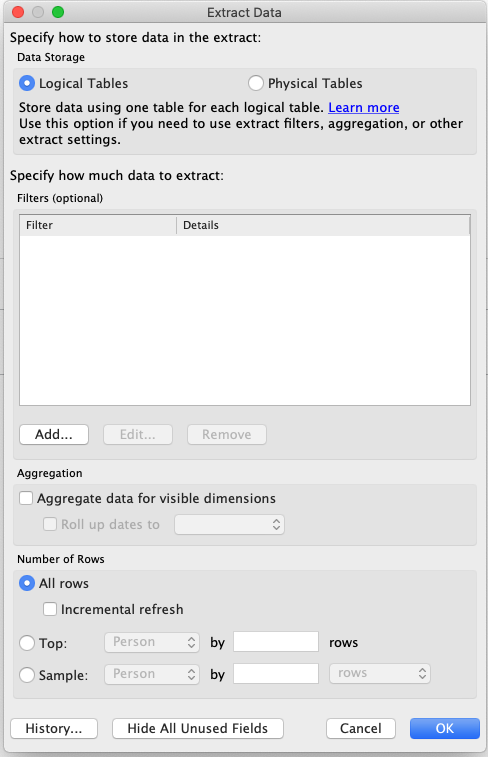
- After you connect to your data and set up the data source on the Data Source page, in the upper-right corner, select Extract, and then click the Edit link to open the Extract Data dialog box.

- (Optional) Configure one or more of the following options to tell Tableau how to store, define filters for, and limit the amount of data in your extract:
-
Decide how the extract data should be stored You can choose to have Tableau store the data in your extract using one of two structures (schemas): logical tables (denormalized schema) or physical tables (normalized schema). For more information about logical and physical tables, see The Tableau Data Model.The option you choose depends on what you need.
-
Logical TablesStores data using one extract table for each logical table in the data source. Physical tables that define a logical table are merged and stored with that logical table. For example, if a data source was made of a single logical table, the data would be stored in a single table. If a data source was made of three logical tables (each containing multiple physical tables), the extract data would be stored in three tables—one for each logical table.Select Logical Tables when you want to limit the amount of data in your extract with additional extract properties like extract filters, aggregation, Top N, or other features that require denormalized data. Also use when your data uses pass-through functions (RAWSQL). This is the default structure Tableau uses to store extract data. If you use this option when your extract contains joins, the joins are applied when the extract is created.
-
Physical TablesStores data using one extract table for each physical table in the data source.Select Physical Tables if your extract is comprised of tables combined with one or more equality joins and meets the Conditions for using the Physical Tables option listed below. If you use this option, joins are performed at query time.This option can potentially improve performance and help reduce the size of the extract file. For more information about how Tableau recommends you use the Physical Tables option, see Tips for using the Physical Tables option. In some cases, you can also use this option as a workaround for row-level security. For more information about row-level security using Tableau, see Restrict Access at the Data Row Level.
-
Conditions for using the Physical Tables option
To store your extract using the Physical Tables option, the data in your extract must meet all of the conditions listed below.
* All joins between physical tables are equality (=) joins
* Data types of the columns used for relationships or joins are identical
* No pass-through functions (RAWSQL) used
* No incremental refresh configured
* No extract filters configured
* No Top N or sampling configuredWhen the extract is stored as physical tables, you cannot append data to it. For logical tables, you can’t append data to extracts that have more than one logical table.Note: Both the Logical Tables and Physical Tables options only affect how the data in your extract is stored. The options do not affect how tables in your extract are displayed on the Data Source page. For example, suppose your extract is comprised of one logical table that contains three physical tables. If you directly open the extract (.hyper) file that has been configured to use the default option, Logical Tables, you see one table listed on the Data Source page. However, if you open the extract using the packaged data source (.tdsx) file or the data source (.tdsx) file with its corresponding extract (.hyper) file, you see all three tables that comprise the extract on the Data Source page.
- Determine how much data to extract Click Add to define one or more filters to limit how much data gets extracted based on fields and their values.
-
Aggregate the data in the extract Select Aggregate data for visible dimensions to aggregate the measures using their default aggregation. Aggregating the data consolidates rows, can minimize the size of the extract file, and increase performance. When you choose to aggregate the data, you can also select Roll up dates to a specified date level such as Year, Month, etc. The examples below show how the data will be extracted for each aggregation option you can choose.

| Original data |  |
Each record is shown as a separate row. There are seven rows in your data. |
|---|---|---|
| Aggregate data for visible dimensions |
3.(no roll up)*| |Records with the same date and region have been aggregated into a single row. There are five rows in the extract.|
|Aggregate data for visible dimensions
(roll up dates to Month)| |Dates have been rolled up to the Month level and records with the same region have been aggregated into a single row. There are three rows in the extract.|
-
Choose the rows to extractSelect the number of rows you want to extract. You can extract All rows or the TopN rows. Tableau first applies any filters and aggregation and then extracts the number of rows from the filtered and aggregated results. The number of rows options depend on the type of data source you are extracting from. Notes:
- Not all data sources support sampling. Therefore, you might not see the Sampling option in the Extract Data dialog box.
- Any fields that you hide first in the Data Source page or on the sheet tab will be excluded from the extract. Click the Hide All Unused Fields button to remove these hidden fields from the extract.
- When finished, click OK.
- Click the sheet tab. Clicking the sheet tab initiates the creating of the extract.
- In the subsequent dialog box, select a location to save the extract, give the extract file a name, and then click Save. If the Save dialog box does not display, see the Troubleshoot extracts section, below.
General tips for working with extracts
Save your workbook to preserve the connection to the extract
After you create an extract, the workbook begins to use the extract version of your data. However, the connection to the extract version of your data is not preserved until you save the workbook. This means if you close the workbook without saving the workbook first, the workbook will connect to the original data source the next time you open it.
Toggle between sampled data and entire extract
When you’re working with a large extract, you might want to create an extract with a sample of the data so you can set up the view while avoiding long queries every time you place a field on a shelf on the sheet tab. You can then toggle between using the extract (with sample data) and using the entire data source by selecting a data source on the Data menu and then selecting Use Extract.
Don’t connect directly to the extract
Because extracts are saved to your file system, it is possible to connect directly to them with a new Tableau Desktop instance. This is not recommended for a few reasons:
- The table names will be different. Tables stored in your extract use special naming to guarantee name uniqueness, and it may not be human-readable.
- You cannot refresh the extract. When connecting directly to an extract, Tableau treats that file as the true source, as opposed to a clone of underlying data. So, it’s not possible to relate it back to your source data.
- The data model and relationships will be lost. The data model and relationships between the tables is stored in the .tds file and not in the .hyper file, so this information is lost when connecting directly to the .hyper file. Additionally, if you extract using logical tables storage, you will not see any references to the original underlying physical tables.
Remove the extract from the workbook
You can remove an extract at anytime by selecting the extract data source on the Data menu and then selecting Extract > Remove. When you remove an extract, you can choose to Remove the extract from the workbook only or Remove and delete the extract file. The latter option will delete the extract from your hard drive.

See extract history
You can see when the extract was last updated and other details by selecting a data source on the Data menu and then selecting Extract > History.

If you open a workbook that is saved with an extract and Tableau cannot locate the extract, select one of the following options in the Extract Not Found dialog box when prompted:
- Locate the extract: Select this option if the extract exists but not in the location where Tableau originally saved it. Click OK to open an Open File dialog box where you can specify the new location for the extract file.
- Remove the extract: Select this option if you have no further need for the extract. This is equivalent to closing the data source. All open worksheets that reference the data source are deleted.
- Deactivate the extract: Use the original data source from which the extract was created, instead of the extract.
- Regenerate the extract: Recreates the extract. All filters and other customizations you specified when you originally created the extract are automatically applied.

Tips for using the Physical Tables option
Tableau generally recommends that you use the default data storage option, Logical Tables, when setting up and working with extracts. In many cases, some of the features you need for your extract, like extract filters, are only available to you if you use the Logical Tables option.
Physical Tables option for extracts that are larger than expected
The Physical Tables option should be used sparingly to help with specific situations such as when your data source meets the Conditions for using the Physical Tables option and the size of your extract is larger than expected. To determine if the extract is larger than it should be, the sum of rows in the extract using the Logical Tables option must be higher than the sum of rows of all the combined tables before the extract has been created. If you encounter this scenario, try using the Physical Tables option instead.
Alternative filtering suggestions when using the Physical Tables option
When using the Physical Tables option, other options to help reduce the data in your extract, like extract filters, aggregation, Top N and Sampling are disabled. If you need to reduce the data in an extract that uses the Physical Tables option, consider filtering the data before it is brought into Tableau Desktop using one of the following suggestions:
- Connect to your data and define filters using custom SQL: Instead of connecting to a database table, connect to your data using custom SQL instead. When creating your custom SQL query, make sure that it contains the appropriate level of filtering that you need to reduce the data in your extract. For more information about custom SQL in Tableau Desktop, see Connect to a Custom SQL Query.
- Define a view in the database: If you have write access to your database, consider defining a database view that contains just the data you need for your extract and then connect to the database view from Tableau Desktop.
Row-level security with extracts
If you want to secure extract data at the row level, using the Physical Tables option is the recommended way to achieve this scenario. For more information about row-level security in Tableau, see Restrict Access at the Data Row Level.
Troubleshoot extracts
- Creating an extract takes a long time: Depending on the size of your data set, creating an extract can take a long time. However, after you have extracted the data and saved it to your computer, performance can improve.
- Extract is not created: If your data set contains a really large number of columns (e.g., in the thousands), in some cases Tableau might not be able to create the extract. If you encounter problems, consider extracting fewer columns or restructuring the underlying data.
- Save dialog does not display or extract is not created from a .twbx: If you follow the above procedure to extract data from a packaged workbook, the Save dialog does not display. When an extract is created from a packaged workbook (.twbx), the extract file is automatically stored in the package of files associated with the packaged workbook. To access the extract file that you created from the packaged workbook, you must unpackage the workbook. For more information, see Packaged Workbooks.