Hello everyone!
Today we going to learn about the core concepts of Git and Github in detail.
The agenda of this article would be to cover:
- Difference between git and Github
- History of git and Github
- Basic concepts of git like commits, branch and repo in detail
So let’s begin our journey into unravelling the mysteries of Git…
Difference between Git and Github
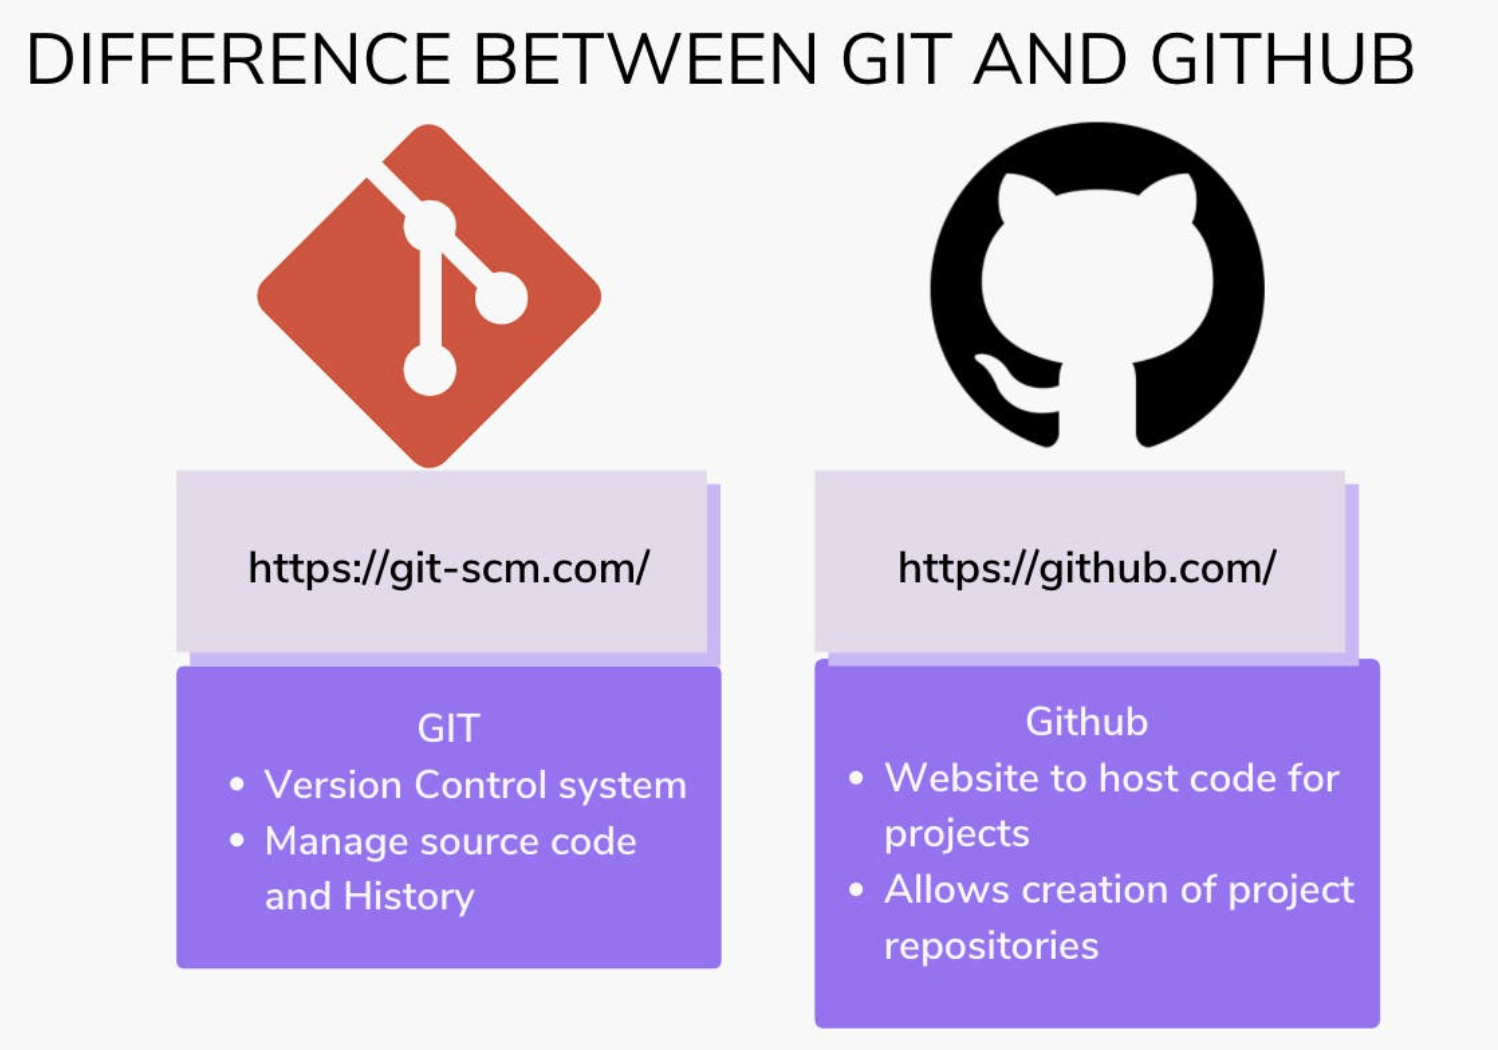
As shown in the diagram above, Git is mainly a version control system used to keep a track of changes occurring in our projects. We kind of make regular entries about the changes happening in our codebase using git. This allows to manage the source code of complicated projects with ease.
It also allows multiple contributors to add code to a single project without making the task of code management too complicated.
On the other hand, Github is a website where we can host our projects online and share them with others. It also allows other people to get access to the codebase and make requests for changes or report issues over the online platform.
To understand this in detail, we must first know how Git as a software was created. So let’s understand it’s history in the next part of the article…
History of Git

As most of us already know, Linux is one of the most popular opensource software used on various platforms. It is used by android phones internally, most supercomputers and servers use Linux based operating systems and even the latest Mars rover used Linux.
Linux as a project was started by Linus Torvalds in 1991. He wrote this program especially for his own PC but later made it available to the developer community for free. Eventually, many developers took interest in its development and started contributing to its source code.
The Linux [kernel](Kernel (operating system) - Wikipedia was an open-source software project of fairly large scope. For most of the lifetime of the Linux kernel maintenance (1991–2002), changes to the software were passed around as patches and archived files. In 2002, the Linux kernel project began using a proprietary version control software called BitKeeper so that it would be easy for developers around the world to add their own changes to the kernel.
In 2005, the relationship between the community that developed the Linux kernel and the commercial company that developed BitKeeper broke down, and the tool’s free-of-charge status was revoked. This prompted the Linux development community (and in particular Linus Torvalds, the creator of Linux) to develop their own tool based on some of the lessons they learned while using BitKeeper.
The development of Git began on 3 April 2005 for managing changes to the Linux kernel. Torvalds announced the project on 6 April and became self-hosting the next day.The first merge of multiple branches took place on 18 April.
Torvalds turned over maintenance on 26 July 2005 to Junio Hamano, a major contributor to the project. Hamano was responsible for the 1.0 release on 21 December 2005 and remains the project’s core maintainer.
History of GitHub
Development of the GitHub platform began on 1 October 2007. The site was launched in April 2008 by Tom Preston-Werner, Chris Wanstrath, and PJ Hyett after it had been made available for a few months prior as a beta release.
GitHub was created to provide developers with the option to host code securely and manage changes to code in a proper manner.
Soon the adoption of GitHub for managing opensource projects grew rapidly due to which paid git hosting became a viable option and paid subscriptions made the project profitable.
After getting sufficient knowledge about the history of Git and Github we can now move over to learning the basics of Git.
In order to use Git, we first need to set it up on our system. You can refer to the below guides for installing Git on:
We are going to use Visual Studio Code to make changes in our code for the rest of the article.
Let take an example where we are creating a doc for the creation of the Instagram clone app. First, create a folder for the project. Initially, we create a README.md file with some content as shown below for the project:-
Hey, I am creating my own version of Instagram.

Features to created:-

1. Photo Feed feature
2. Search functionality
3. Profile section
4. Feature to allow users to upload
Let’s assume that these are our final changes for the day and we want to make a note of these changes somewhere. For this purpose, we can set up git in our project to track daily changes happening in our code.
First, we initialize git in our project by running the below command in our VSCode terminal :-
git init
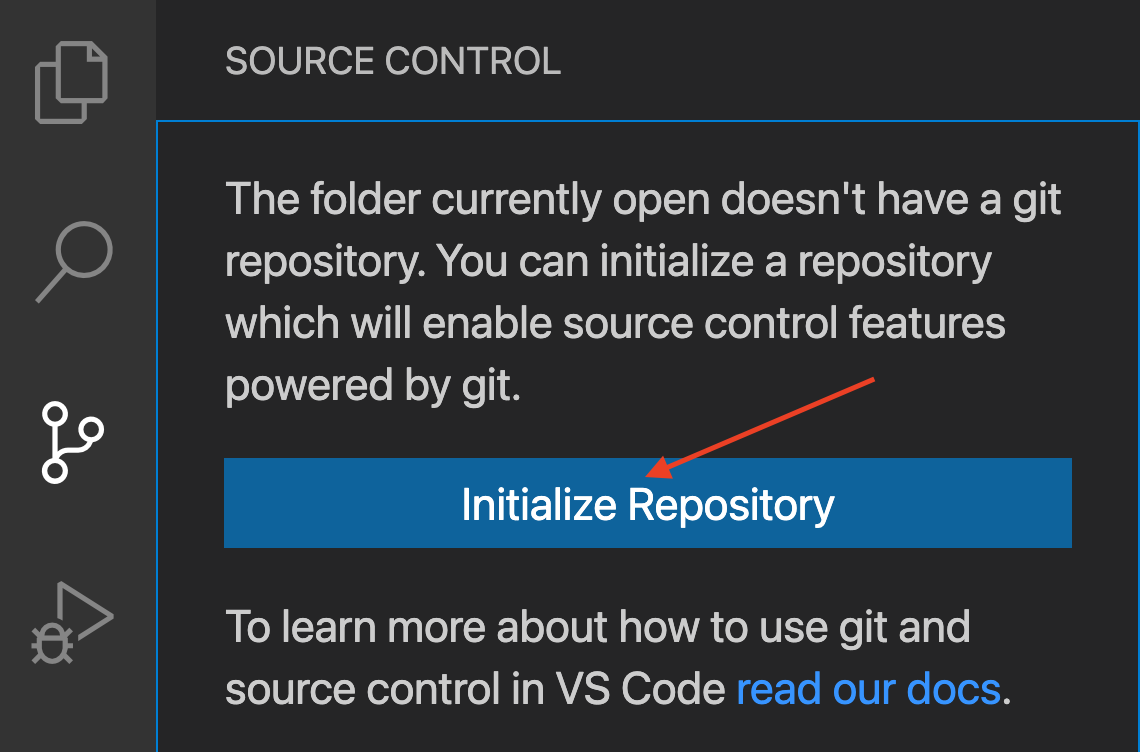
Alternatively, we can initialise a git repository directly in our project using the Initialize Repository button present in Visual Studio Code.
When we want to make daily entries of changes happening in our project via Git we make use of a concept called commits. Commits allow us to save a snapshot or a temporary photo of the current state of code. Developers use a unique message with each commit to keep track of what changes they did at a particular time in the project lifecycle.
We can create our first commit for our project by running the two below commands:-
// command to add a particular file for tracking changes
git add README.md
// command to create a commit with a unique message
git commit -am "Entry of all the features to be built"
Alternatively, we can also do this step directly using the VSCode source control pane:-

This will create the first commit for us in the project ![]()
Next, we can see the entry for this commit by running the below command in the terminal:-
git log
The output of this command is as shown in the below image:-

We can see the message which we added in our git commit command in this output at the bottom.
Also, we get information about the time at which this commit was made and the author who made the changes.
If you observe the yellow text carefully in the image, you will see a long string of random characters. This is called a commit id.
Commit id allows machines to keep a track of all the commits happening in the project. In simpler terms, it is the machine’s way of adding commit messages to the code. The machines can later use this to understand the commit history on their own.
You can add a few more changes to the README.md file and make commits to get a better hang of the process of committing changes.
Just like a collection of students forms a division or class in school, a collection of commits in git forms a branch. If you would like to see which branch you are currently using to make the commits, then run the below command in the VSCode terminal:-
git branch
Most likely you will get master or main printed in the terminal output. This is the primary branch for a project in git. We can create our own branches with different names but keep in mind that usually, all the main changes for a project are in the master/main branch only.
Let’s try to create a different branch in our project by running the below command in the terminal:-
git checkout -b photo-feed-branch
Now if we run git branch again in our terminal, then we will see two branch names with photo-feed-branch highlighted as shown below:-
saurabh@MacBook-Pro 1_Github_VSCode % git branch
  master
* photo-feed-branch
This shows that photo-feed-branch is now the active branch for our project.
We can repeat the process of adding a few more commits to this branch:
Let add some additional text in the features section of our README.md file:
Hey, I am creating my own version of Instagram.
Features to created:-

1. Photo Feed feature
   1.1 Photo frame UI added
   1.2 User details
   1.3 Comment box to be added
2. Search functionality
3. Profile section
4. Feature to allow users to upload
Next, we can add a commit to our project by running the below commands:-
git add README.md
git commit -am "Sub tasks in photo feed feature added"
If we check the git commits using the git log command we get the below output:-
commit 72a39d1d942bc519636695f9310f94de2c2496f6 (HEAD -> photo-feed-branch)
Author: Saurabh Mhatre
Date:   Sun May 16 20:40:08 2021 +0530

    Sub tasks in photo feed feature added
In the beginning, there is text stating HEAD -> photo-feed-branch. This means that the commit below has been added to the photo-feed branch.
If we want to switch back to the master/main branch, we can run the below command to do so:-
git checkout master
The output in the terminal would be:-
Switched to branch 'master'
If we run the git branch command now, the output will show master as the highlighted branch:-
* master
  photo-feed-branch
Just like a collections students form a division/class and a collection of divisions forms a school, a collection of commits form a branch and a collection of branches form a repository in git.

A repository is a central location in which all the changes done to a project are stored. As shown in the image above, it is at the topmost level in the git hierarchy of tracking changes. We will learn more about repositories after we upload this project on Github.
Thank you for reading, If you have reached so far, please like the article, It will encourage me to write more such articles. Do share your valuable suggestions, I appreciate your honest feedback!
See you in my next article, Take care!!