
 SQL
SQL
 HTML/CSS/JS
 Coding


 Settings
 Logout
- Provide access to data sources.
- Deepen your understanding of the tradeoffs between using a live connection and an extract.
- Test the performance differences that might occur between a live connection and an extract.
Provide access to data sources
Providing access to data sources starts with understanding how various data sources handle authentication—that is, sign in. In most cases, databases, cloud data, and cubes require users to authenticate before they can access data. The details for authentication are unique to each connector, and authentication is handled by each connector.
As an administrator, you might need to coordinate access to data with the database administrators or data team in your organization. If you are the data team, you’ll need to understand the data that your organization uses and the authentication requirements that they enforce. For example, when a Tableau user connects to MySQL, Windows authentication is required for access. Users on Tableau Desktop for Windows aren’t prompted. But if a user has a Mac, the Tableau Desktop connector for MySQL prompts Mac users for credentials when they attempt to connect.
When possible, we recommend per-user authentication for access to data. However, in some cases the Run As service account can be used to access databases or file shares. One example is SQL Server. If the user publishes a workbook that uses a live connection to SQL Server (not an extract connection), Tableau Server automatically uses the Run As service account when other users access the workbook. This means that when another user opens the workbook, that user’s access to data is defined by how much access you as administrator have provided to the Run As service account.
As discussed in the Planning Your Deployment chapter, we recommend that you configure the Run As User for “least privilege” access. In most cases, this means read-only access to the data sources that the account will access.
Let users embed credentials (or not)
As administrator, you can decide to let users embed passwords (which are encrypted) in the workbooks and data sources that they publish to the server. In that case, when others use those workbooks or data sources, they can see the data without having to provide credentials.
To enable or disable embedded credentials, sign in to Tableau Server.
In the site menu, click Manage All Sites, and then click Settings, and then click the General tab.
Select or clear the Allow publishers to embed credentials in a workbook or data source option.
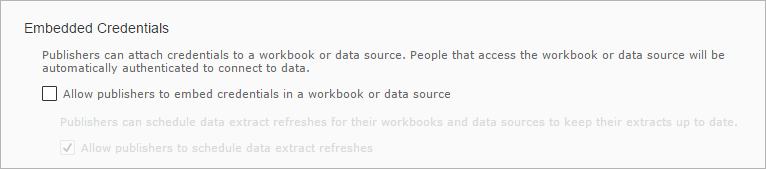
This is a server-wide settings—the setting you make here applies to all workbooks on all sites.
We should note that there are scenarios where embedded credentials can inadvertently provide access for users who shouldn’t see the data. Therefore, for organizations that require user-level authentication to databases, we recommend disabling embedded credentials. Users are then prompted for credentials when they open a workbook, data connection, view, or dashboard that gets its data from a source that requires authentication.
On the other hand, some organizations use Tableau Server as a single managed entry point for data analysts. In this scenario, embedding credentials can make business sense—all the Tableau users who need access to the database can use the single set of credentials that is embedded in workbooks or in data sources.
Set data source permissions
Publishing data sources to Tableau Server lets people on your team provide centralized access to data. It enables data sharing among users, including those who don’t use Tableau Desktop but have permission to edit workbooks in the web editing environment. Users working with Tableau Desktop can publish data sources that contain extract or live connections.
As the administrator, you determine which users have the right to publish data sources. These users must have a site role of at least Publisher for the site. In addition, non-administrator users must have View and Save permissions for the project that they want to publish to. (For a review of user permissions, see the Structure Content Projects, Groups, and Permissions chapter.)
Aside from determining who can publish data sources, you can set permissions to determine who can connect to data sources and who can edit them. You can configure access by setting the following permission roles for the project or for individual data sources:
- Connector. This permissions role sets permissions that allow the user or group to connect to the data source from a workbook on the server (web authoring) or in Tableau Desktop.
- Editor. This permissions role sets permissions that allow the user or group to connect to the data source on the server and also to publish, edit, download, delete, set permissions, and schedule refreshes for the data source.
You can set permissions on individual data sources in a project only if that project is unlocked. As you read in the Structure Content Projects, Groups, and Permissions chapter, we recommend setting permissions at the project level and locking projects after you have configured permissions.
To set permissions on data sources in a project, follow these steps:
- Sign in to Tableau Server.
- Click site menu at the top of the page, and then select the site to work with.
- Click the Content tab, click Projects, and then select the project on which you want to set permissions.
- Under Actions, click Permissions.
- Select or add the user or group that you want to assign data source permissions to.Under Data Sources, select the permissions role that you want to set.
- Click Save.

Share CSV, Excel, or Access files via a live connection
Some of your users might analyze data that’s in CSV (comma-separated values), Microsoft Excel, or Microsoft Access files that live as standalone files in a folder. Often these files are treated like a database—for example, several users might be using Tableau to analyze data in an Excel file that’s on a shared network location, and someone (perhaps those same users) is also updating the file frequently.
(To be clear, accessing a standalone file on a shared network location is not on a par with using a dedicated, multi-user database like SQL Server, MySQL, or Oracle. CSV, Excel, and Access files don’t offer the type of performance, user-level security, or rich querying capabilities inherent in relational databases.)
The procedure we provide here shows you how to share Excel files using a shared folder on a Windows computer that’s running in an Active Directory environment.
In this scenario, the Run As user service account that you created and configured for Tableau Server is used as the security context to access the Excel file on a network location.
Set up the shared network location
Go to the File sharing over a network in Windows 10(Link opens in a new window) page on the Microsoft Windows site and follow the procedure under “How do I share files or folders over the network now?.” Those steps describe how to a share a folder with “Specific people” that will be accessible inside your organization using a UNC (universal naming convention). The “Specific people” that you will give access to is the Run As service account.
The UNC name consists of a server name followed by a folder name, much like a web address, to access your shared folder. Here’s an example, where DATATEAM is the name of the computer and shared is the name of the shared location on that computer:
\\DATATEAM\shared
The location referred to by shared can actually be many levels deep in the folder hierarchy, even though that’s not reflected directly in the UNC name.
When you run the Windows File Sharing wizard, you enter the user account or accounts for people who want to share the content. For this procedure, enter the Run As service account, and then set the Permission Level to Read. This means that any process that runs as the Run As User can read the shared location. In our case, of course, that process is Tableau Server.
The last page of the File Sharing wizard displays the UNC path. Make a note of this path and send it to your users so they know where to connect to the shared Excel files.
Add the Excel file to the shared location
After you’ve set up the shared location, copy the Excel file (or files) that you want to share to that location.
Create a workbook that connects to the shared Excel file
This procedure describes how to access an Excel file on the shared network location and then how to publish that data in a workbook to Tableau Server. This is really a procedure for your users, so make sure they know how to follow these steps.
After users publish using this method, other users who access the published workbook will see data that’s coming directly from the shared Excel file. Users can also refresh the data from the Excel file while working in the Tableau workbook.
- Open Tableau Desktop. On the start page, under Connect, click Excel.
- In the Open dialog box, enter the UNC path in the file field at the top, using the format
\\computer-name\share-location-name. - Select the Excel workbook you want to connect to, and then click Open.
- Create a Tableau workbook as you normally would, but do not extract the data from Excel.
- To publish, click Server > Publish. When you’re prompted, enter the Tableau Server address, and the credentials for a Tableau user that has permissions to publish.
- On the Publish Workbook to Tableau Server page, clear the Include External Files check box. Click OK.

- Set permissions if required, and then click Publish.

Keep data fresh
In many cases, the data that’s displayed in a workbook or view changes after the user publishes the workbook. For example, if a user has a workbook that displays monthly sales information, the data for the workbook has to be updated at least every month.
If the data source for the workbook has been configured to use a live connection to the data, the workbook can read updated data every time the workbook is opened. (That’s what we showed you in the procedure just before this section.) But if the data source for the workbook relies on an extract connection, the extract has to be refreshed with the latest data.
When a user publishes a workbook with an extract, the extract is stored on the server. The data is then included with the workbook when a user downloads the workbook or views the workbook on the server.
You can refresh an extract in two ways. A full refresh replaces the current extract with new data. An incremental refresh adds any new data to the existing extract. (In order to support incremental refreshes, the data has to include data like a date stamp or sequential ID that can be used to indicate where to start the incremental refresh.)
Your users can refresh an extract immediately in Tableau Desktop by selecting a data source on the Data menu and then selecting Extract > Refresh.
As an administrator you can also refresh extracts immediately:
- Sign in to Tableau Server.
- At the top of the page, click Tasks.
- Under Extract Refreshes, select the workbook or data source that you want to refresh.
- On the Actions menu, click Run Now.
Set refresh schedules that users can choose from
When a user publishes a workbook that includes an extract, the user can set up a refresh schedule. This setting is available from the Publish Workbook dialog box in Tableau Desktop.
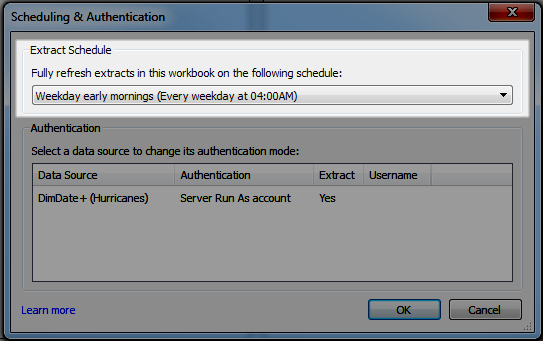
As the admin, you control the refresh schedule that is presented to users when they publish (the highlighted area in the screen shot). To change the refresh schedules that your users can select, follow these steps:
- Sign in to Tableau Server.
- At the top of the page, click Schedules.
- Disable, delete, or edit any existing schedules that you don’t want by selecting the schedule, and then clicking the appropriate action on the Actions menu.
- Create a new schedule by clicking New Schedule and then setting a schedule in the New Schedule dialog box:

Determine the frequency of scheduled refreshes
Refreshing an extract can be resource heavy, especially if you’re trying to run multiple extract refreshes at once. Therefore, it’s generally a good idea to run extract refreshes during non-business hours, and to schedule them as far apart as your business needs allow. A common approach for large extracts is to run incremental refreshes every night during non-business hours, and then run a full refresh over the weekend.
Configure data connection caching
As you plan your data source strategy, you should know how Tableau Server caches workbook data that’s hosted on the server. Understanding data connection caching is especially important for organizations that rely on real-time or near real-time data analysis.
Consider a workbook that has a live connection to a database. As users interact with this workbook in a web browser, Tableau Server stores the data that’s returned by queries in a cache. That way, if user interaction in the workbook results in a query that’s already been issued, Tableau can try to read the data from the cache. Getting data from the cache is usually faster than rerunning a query, which helps the user stay in the flow of their data analysis.
By default, Tableau Server will cache and reuse data for as long as possible. To configure caching behavior for all data connections:
- Run the following command to set the cache:
tsm data-access caching set -r <value>Where<value>is one of these options:
-
lowor empty string (""). This is the default value. Tableau Server will cache and reuse data for as long as possible. -
<n>. Specifies the maximum number of minutes data should be cached. For example,tsm data-access caching set -r 2sets the maximum number of minutes to 2. -
alwaysor0(zero). Either of these values configure the cache to be refreshed each time a page is reloaded.
- Apply the changes. Run the following command:
tsm pending-changes apply
In all cases, regardless of how caching is configured, users in Tableau Desktop can click Refresh Data on the toolbar to force the server to send a new query and retrieve the latest data. Additionally, users accessing data through a web browser can append the :refresh parameter to their URL